Hibiscus flowers are iconic—conjuring up thoughts of tropical paradises and beach vacations. These bright, beautiful blossoms are native to warm, tropical regions but make gorgeous garden plants where climates are conducive for growing them outdoors.
When cared for correctly, your outdoor space will come to life when the exotic-looking hibiscus blooms open.
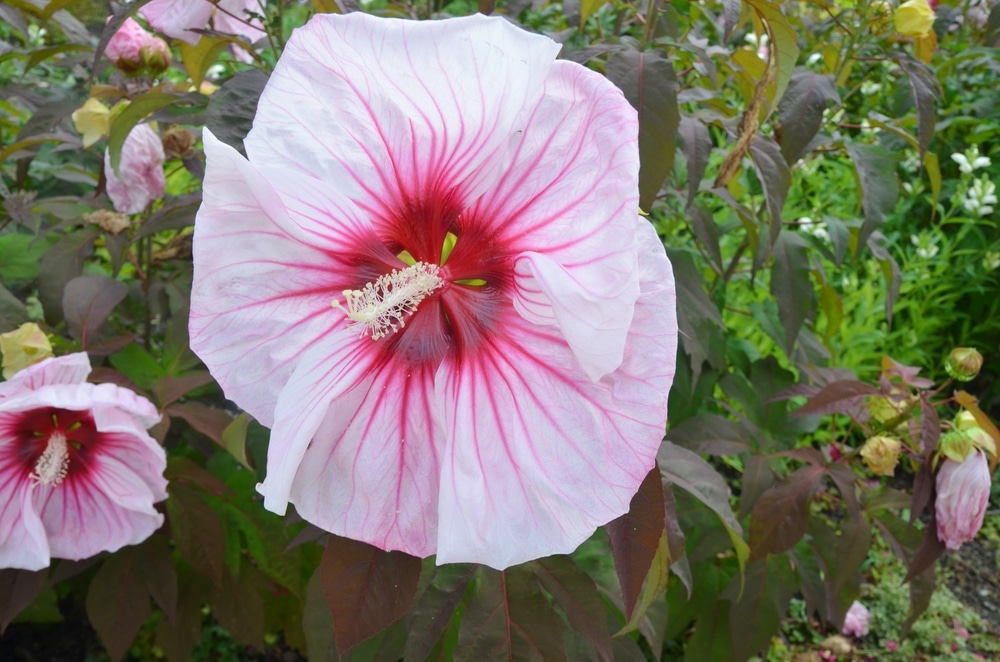
What are Hibiscus?
Hibiscus is a genus containing flowering plants in the mallow family with almost 300 species and many more cultivars and hybrids. The large, disc-shaped flowers look similar to hollyhocks and can span up to 12” across, drawing in butterflies and hummingbirds. Depending on their hardiness, plants are categorized as perennial or tropical.
Dwarf varieties stay small, growing to only a few feet tall. Standard types can reach an impressive 8’ tall.
Flowers range from white, lavender, pink, and red and may come in a combination of these colors.

Growing and Caring for Hibiscus
Perennial hibiscus (Hibiscus moscheutos) are easy to care for, especially considering how rewarding the blossoms are!
It’s critical to grow them in the appropriate growing zone, give them full sunlight, keep the soil moist, and fertilize them regularly. You also need to know what they need to survive winter. When cared for properly, they thrive and develop unique flowers.
Make Sure You Know Your Hardiness Zone
Before determining what hibiscus you can grow—and how you’ll grow it—you’ll need to know your USDA hardiness zone. Perennial hibiscus flourish in zones 5-6, where summertime temperatures are moderate (60 – 90°F), and temperatures drop as low as 20°F in the winter.
Tropical hibiscus need warmer temperatures, so they are typically planted in more tropical locations or grown as container plants.

Should You Start Plants from Seed or Not?
It’s most common to buy young plants for planting.
Unlike perennials such as sunflowers or black-eyed Susans, it is challenging to start hibiscus from seeds. They often need seed treatments to hasten germination and can still take a long time to sprout.
Instead, plants are typically propagated via cuttings, producing clones identical to their parent plant.
Choosing a Spot in Your Garden
Before planting your new hibiscus, it’s essential to choose a permanent home carefully—plants do not transplant well.
Look for a place with full sun exposure for the best blooms. Hibiscus will tolerate partial shade, but the blossoms may be lackluster.
Pick a spot protected from strong winds to avoid the long stems breaking during storms.

How to Plant a Hibiscus
Before planting, check the garden soil with a home pH kit to determine the pH value. Hibiscus like slightly acidic soil p(H of 5.5 – 7.5) and grow best in the 6.0 – 6.5 range. At this time, you can also work in some organic matter like finished compost to improve the soil fertility.
After amending the soil, dig a hole twice as wide and as deep as the plant’s roots. Remove the plant and set it into the planting hole, so the potting soil is just slightly below the soil surface. Then backfill the hole, tamping the soil down to remove air pockets.
Give your plants two to three feet of space between plants, so the blossoms have enough room.
Correct Watering for Gorgeous Blooms
Hibiscus are tropical plants, so they love water. During the spring and summer, keep the soil moist to encourage bountiful flowers in July and August. In some climates, this may require you to water your plant every day.
Once your hibiscus stops blooming for the season, you can scale back on watering, especially when growth slows for the winter.
To help keep soils moist, you can add a layer of mulch on the soil surface. Just make sure to keep material away from your plant’s stem.

When and How to Fertilize Hibiscus Plants
To produce such beautiful flowers and grow tall, plants need a good deal of fertilizer. Hibiscus are considered heavy feeders, so you’ll need to feed them a little more often than other garden plants. You’ll only want to feed plants until flowering—feeding when growth slows can cause root burn.
Once plants start actively growing in the spring, feed them every couple of weeks with a half-dose of fertilizer. Continue this until the flowers fade for the season.
The best fertilizers for hibiscus are rich in phosphorus and potassium and contain less nitrogen. Too much supplemental nitrogen encourages foliage growth and will inhibit flowering.

Do you Need to Prune or Deadhead Plants?
Perennial hibiscus that die back to the ground in winter don’t need to be pruned other than to remove dead or diseased branches. Tropical hibiscus can benefit from regular pruning since the above-ground foliage doesn’t die off each fall. Pruning tropical plants can help promote late-season growth and keep your hibiscus looking tidy as they grow.
After flowering finishes for the season, remove diseased, damaged, or dead branches and all old wood growing in the center of the plant. Then prune your tropical hibiscus plants back by one-third. Removing the material helps improve air circulation through the center of the plant.
Don’t worry if you prune a little heavy-handed. Your plants can handle it.
Deadheading spent blossoms isn’t necessary, but removing old flowers before they develop seed heads can encourage your plants to re-bloom.

Preparing Your Plants for Winter
Perennial hibiscus varieties will die down to the ground in colder climates as many perennials do. To encourage good spring re-growth, trim the plants to about six inches above the ground in the fall or early spring. You don’t need to do anything in warmer climates. The foliage will stay green through winter, but flowering will stop until spring.
What Pests and Diseases are Common in Hibiscus?
Hibiscus are relatively pest and disease-free, but they sometimes have problems with red spider mites, aphids, and Japanese beetles. The mites become an issue when humidity levels are low and the air is dry.
All three insect pests are easily controlled by spraying infected plants with insecticidal soap or all-natural neem oil.
Propagating New Plants Using Cuttings
Starting new hibiscus plants from cuttings follows the same principles as propagating stem cuttings from other herbaceous plants, houseplants included. Always propagate from healthy plants when they are actively growing in the summer—this increases the chance of success. Once stems mature and become woody, they will take longer to root.
- Remove a 4-6” piece of stem from your plant using clean, disinfected pruners. Take no more than a handful of cuttings from a single plant.
- Remove the leaves from the bottom of the stem, leaving the top two or three.
- Make a 45° diagonal cut through the bottom of the cutting, preferably through a node where leaves were attached.
- Dip the cut end of the stem into a rooting hormone.
- Set the cutting(s) in 2-3” clean water, ensuring the leaves are above the waterline.
- Put the cuttings where they receive indirect sunlight.
- Change the water every few days to prevent microbial growth.
- Once new roots develop, transplant your cuttings into containers filled with a mixture of potting soil and peat moss.
If you’d like to cut steps out of the propagation process, after dipping the cuttings in rooting hormone, you can plant them directly into containers.


